

f creating a design from scratch in Canva makes you a little bit nervous if facing a blank page makes you a bit uncomfortable because you don’t know where to start. Well, my friends you’ve clicked on the right website in this article, I would explain seven design principles that you can follow the next time you design in Canva. So you can create with more confidence.
Hi everybody. My name is Saurav Kant. First of all, welcome to our Website. If this is your first time here, make sure to visit our website regularly. As we publish new articles , blogs or new stories, every weekday courses, webinars, tutorials, we’ve got everything you need right here on this website for you to become a better designer.
Now we realize a lot of you guys do not come from a design background or. You may not be familiar with everything you can do with Canva and that’s okay. We are here to help in this website. I will do my best to break down seven key design principles that should boost your confidence. Whenever you start a design in Canva, especially when you design from scratch, AKA not using a template.
1. Emphasis
The first principle is to be clear on what you want to emphasis. It is when one element stands out in your design and there are lots of ways we can emphasis something. If we take this Instagram story, for example, we can make this middle textbooks stand out by making it bigger, broader or brighter than everything.
We use emphasis to drive people’s attention to the parts of our design. We want them to notice first it could be a call to action. If you’re creating a social media post or a date and time, if you’re creating a flyer to invite people to your event, let’s have a look at this flyer. I want people to quickly understand when the event is taking place.
So what are you doing I will emphasis the date by changing the color of. What I really did here is to create contrast with the rest of my design. So that the date kind of jumps at you. When you look. That’s emphasis and that’s the first design principle I would like you to remember when you start a design in Canva, ask yourself what is the most important piece of information I want to communicate here.
Understanding what needs to be emphasis is the first and most important step. Now let’s have a look at different techniques to create emphasis.
2. Contrast
use contrast to make things pop at its most basic level contrast is difference. It’s the difference between dark and light, big and small thick, and thin. Oh, patterned and plain, an easy way to create contrast in your design is to use opposite elements or opposite attributes. These opposites, with a clash, with one another generating focal points in your design, they will make your design more interesting and help you create emphasis on certain elements. Now let’s look at a few different ways to create contrast in your design.
a. Create Contrast With Colors
Number one is to create contrast with colors. For example, if your design has a dark background, use bright or light colors for the elements, you want people to focus on people who will naturally be attracted by the brightest color on the page. So use that to create a focal point. Another technique you can try to create contrast with colors is to use bright text boxes over black and white photos.
b. create contrast with size
We also called this technique hierarchy. The rule is simple. The biggest element on your design is what will get noticed first. So you want to make the most important element bigger than the rest, and this applies to text, but also your layout or shapes that you might be using in your design.
Number three is to create contrast, which shapes if your design uses a lot of the same shape. You can create contrast by breaking the pattern and using a completely different shape by introducing a rounded shape. For example, in a design with a lot of squares, rectangles and hard edges, you can create that focal point.
c. contrast with textures
And the fourth way you can create contrast is with textures. Here we are combining textured background with plain shapes to create, contrast and attract the viewer’s attention you can. Of course also create contrast when working with typography. Combining small funds with larger ones, bold fonts with thin and ones or bold funds with handwritten ones.
So as you can see, the same principle applies with topography by adding contrast between different funds we use, we create emphasis on certain words. If you are into this, I really encourage you to explore the text tab in the Canva editor to find more preset font combinations here. Our Canva graphic designers have made the hard work of finding funds that combine well together to help you out.
3. Don’t Be Afraid Of White Space.
We call it white space. Any area of your design that is not taken up by other elements. But don’t get full by the name. You can have white space, even though your background is dark or blue or yellow, or even if it’s a photo in graphic design, we use white space to create emphasis, but also to group relevant elements together or to improve legibility.
And the problem is that white space is often misunderstood by beginner designers. They feel like they are wasting good design real estate. If they’re not filling up the space that is available with more design elements, they think, look, there’s still plenty of space in that design. Let’s add more stuff.
Not adding enough word space. White space will result in having a design that is cluttered and confuses the viewer. They will not know what to focus on or where to look first. So what do you want to do instead is to create empty area that give you design some space to be. Now let’s see how to utilize white space.
In the following example,
white space makes our designs easier to look at the creator of this particular design right here created emphasis on the text by leaving a bunch of white space in the upper part of the poster. And this had draw our attention to the text at the bottom. Also observe how playing with different text sizes and colors created hierarchy and influence the order in which you read them message.
4. Drive The Eyes With Movement
Movement is how our eyes scan the page. When we discover a design for the first time, it’s also how we go from one element to the next. You can use lines, size shapes, and colors to create movement in a still design, like in this classic book cover for.
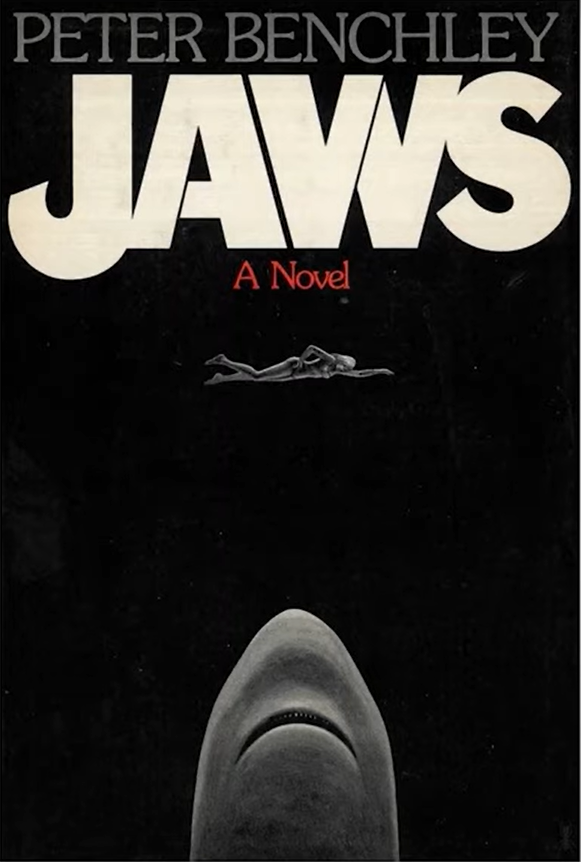
The contrast created by the white text on the black background, attracts our eyes to the title of the book jar. Then we move down the page and we see the shark lurking beneath and only then do we come back to the smaller object, the swimmer, and maybe the text in red. This is a great illustration of how movement dictates, where we look first, Second and third.
Canva also makes it easy for us to use movement in a design, but this time in the more literal way, and I’m talking about creating actual movement with animated elements called stickers, try searching for stickers. When located on the elements tab, you will find a multitude of moving elements that will for sure grab the attention of viewers when placed in your design.
5. Reinforce Your Idea With Repetition
Repeating an idea in your design is a great way to reinforce it. Repeating a pattern, the color or shape or texture on your design can also help you create consistency. Make the design look more uniform. And this is particularly true when creating longer documents like presentations.
For example, one thing I like to do when creating slides for a presentation is to repeat certain colors, funds, or even photo filters to create a sense of visual consistency across the entire presentation. Indeed. If you were to use different fonts and colors on every single slide of your presentation, It would feel quite uncomfortable to watch and also chaotic.
My tip here is to use canvas brand kit and create a specific color palette and a font hierarchy. For every presentation you need to design, this will help you stay on brand and for short reinforce the overall consistency of your slide deck. And if you want to learn more about brand kit and how to set it up, I will post another article so you to read later, which leads me to design principle number.
6. Tell us what’s important with proportion
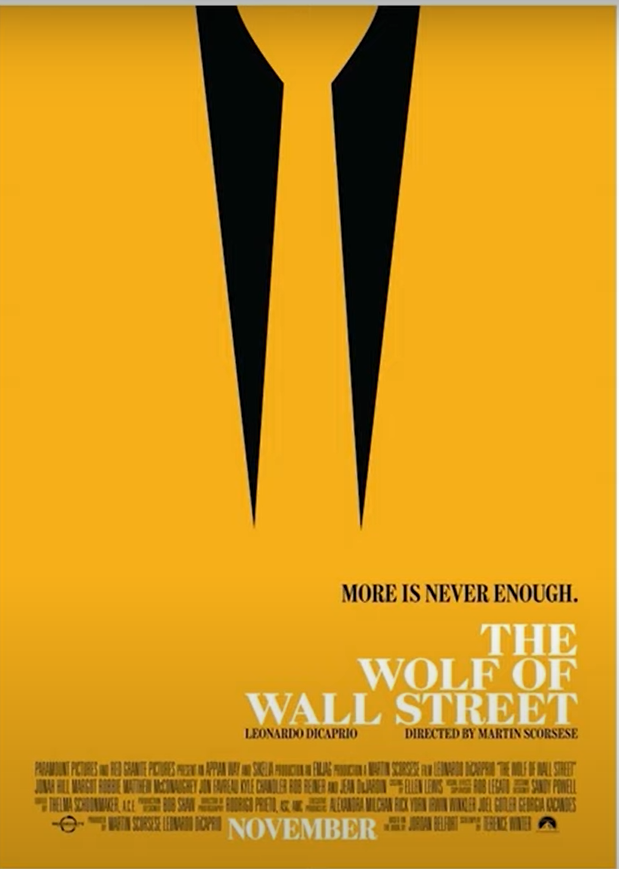
Proportion in design refers to the size of elements in relation to each other. Our larger object is more likely to draw the viewer’s attention, making it more important in this image example, the most important element is the tagline. So the designer made that textbooks, the biggest element on the page while the other elements are smaller.

And of course, on top of giving us an indication of what’s important in a design proportion also plays a role in ensuring coherence. For example, when creating a design that features a cup of tea spoon, and a book, the spoon should be smaller than the cup and the book should be the largest elements of both.
To remain coherent and realistic, make sure you respect the proportions of each element and how these elements relate to each other.
7. Create Harmony By Mastering Balance
Balance is how you position objects inside your design. A good way to look at balance and understand how to use it is to remember that every element that you place on your page has a weight to it. That weight comes from its color size. Balance refers to how you distribute these elements on your page and the general feeling that arrangement creates in the design.
It feels either balanced or imbalanced. Now you can balance your elements, symmetrically or asymmetrically symmetrical balance will give you design a sense of security. The viewer will feel safe knowing the design has been well-structured and everything looks like it’s in the right. Now, while this type of balance might feel safe, it could also appear as a bit traditional or even boring in some cases.
And then you have asymmetrical balance where elements are not balanced in exactly the same predictable way. For example, you might have on one side of your design, a larger object on which we want to emphasize, and that is balanced with less elements on the other side or smaller elements on the other side of your.
It’s still balanced, but it’s not mirrored or symmetrical, like in the previous example when executed well, asymmetrical balance will make your designs more dynamic and interesting. So there you go guys, seven design principles that if you follow, I guarantee will help you become a better. Now for those of you who wish to dive a little bit deeper and maybe find some clients and start making money with Canva as a graphic designer.
How are yawl doing guys? I hope you find the content of this article needful. And if you do consider giving us a good comment, this will help us put this front in front of more people on social media.
Source: https://friendswebdesigner.com/7-principles-to-become-a-better-canva-graphic-designer